
So far we have gone through different components of AngularJS, such as Data Binding, Modules and Controllers, Scope, Custom Services, and Filters. In this blog, we will discuss custom Directives, followed up by Dependency Injection, Functions and Routing.
Before we proceed to Custom directives, please go through the previous blogs (mentioned above) to have a better understanding of Angular and its components. Not to mention this part of the series requires advanced-level knowledge of AngularJS.
In AngularJS, Directives allow you to extend HTML. The directive allows you to create custom tags in AngularJS. By adding existing or custom Angular Directives, one can get the functionality work in the application. Technically AngularJS tells the browser while compiling, to attach behavior to the element or transform the DOM element. We can also manipulate DOM using jQuery, however, creating custom directives let you reuse the element across the AngularJS application as per your requirement.
Note that AngularJS allows you to Create Controller & Services for an application. Similarly, we can also create Directives in AngularJS.
Most of you have seen the basic directives that we use in everyday application development. They are ng-app, ng-init, ng-model, ng-repeat.
Ng-model binds the value of HTML with angular.
Ng-repeat repeats HTML element.
Ng-init initializes data for the app.
Ng-class dynamically binds CSS classes to HTML & these directives could be a string, object or an array.
Ng-app is used to the bootstrap application.
Relevant: Everything about Filters in AngularJS
In AngularJS, Directives starts with ng- or data-ng-. And there are various ways we can create directives in AngularJS:
One of the basic way is:
Another way is:
It’s quite similar to HTML where we store custom data that will be stored in a page or an application. You can also validate the same through HTML editor.
Custom Directives:
We can declare custom Directives only after declaring the same as mentioned below:
/
AngularJS provides the naming convention for custom directives so that the name of an attribute will match to custom Directives. There are few guidelines & suggestions from AngularJS while declaring and calling the same in your application.
- Try to write Directives name in the lower case.
- Suppose your new Directive is ‘MyNewDirective’. To call directives in the View, write my-new-directive, my_new_directive, my:new:directive, you can use (,) comma colon(:) underscore(_) hyphen(-).
- Template property for Directives allows you to add the HTML content to the HTML.
Sample code:
- In case you want to make HTML content more dynamic based on some business logic then use link keyword to achieve the same. Also known for DOM manipulation, Link function accepts three parameters: Scope, Element, and Attribute.
- Also, we have scope property under AngularJS custom Directives. This is all about boundaries/limitations of a directive to use controller object. It provides an ability to isolate parent controller scope property and different ways to use under your custom Directives. Will take it up here using some of the examples.
- We can also define Angular Controller inside the Directives and manipulate the scope inside controller function itself.
- Custom Directives uses a property called replace that tells, which Directive element needs to be applied. By default, it remains in a disable mode and applied directly to the child element. To enable, we need to add replace: true as one of the directive parameter.
with replace: true
Output:
with replace: false(default)
Output:
- Custom Directives uses a keyword ‘restrict’ that allows you to define the variety of HTML element.
E: Application look for matching HTML element and enable HTML tag.
Syntax:
sample:
A: Application look for matching HTML attribute and enable Directive HTML attribute.
Syntax:
Sample:
C: Application look for enabling CSS, when app finds matching CSS class then Directive get replaced.
Syntax:
Sample:
M: Directive is used very rarely, when we require to pass markup validations. And activated once AngularJS finds match HTML comment.
Syntax:
Sample:
We can also include these directive Restrict option under single restrict.
Sample: restrict ‘AEC’ or restrict ‘ACE’ or restrict ‘CEA’
All have to reflect the same o/p irrespective of order. By default, restrict takes ‘AE’ as parameter option.
Sample code:
- Under Custom Directives declaration, we have one more keyword - ‘template’ - that is used to specify the HTML content to be added in the View.
sample:
    return {
          restrict: ‘E’,
          template: '
{{result}}
' };
So far we have seen definition, using guideline. Let’s see how to create a custom Directive. Remember that creating a custom Directive is quite similar to factory service creation and it returns HTML.
App.directives(‘newCustomDirectives’, function() {
    return {
    template: “
Custom Directives with custom template.
” }; });
And same could be rendered in view as shown below:
So any directive name written in the uppercase could be pulled to the view by eliminating uppercase with hyphen and lowercase.
Eg.: ‘newCustomerRequest’ should be ‘new-customer-request’
‘newCustomerRequest’ should be ‘new:customer:request’
The above source code will create custom Directive and inject HTML directly in the View.
Directive.html
Directive.js
The above source code is used to render data from custom Directives. Some of the Directives like ng-app, ng-controller are also available for app bootstrapping and compile your code functionality based on your app controller in browser. When ng-directives found in your HTML code.
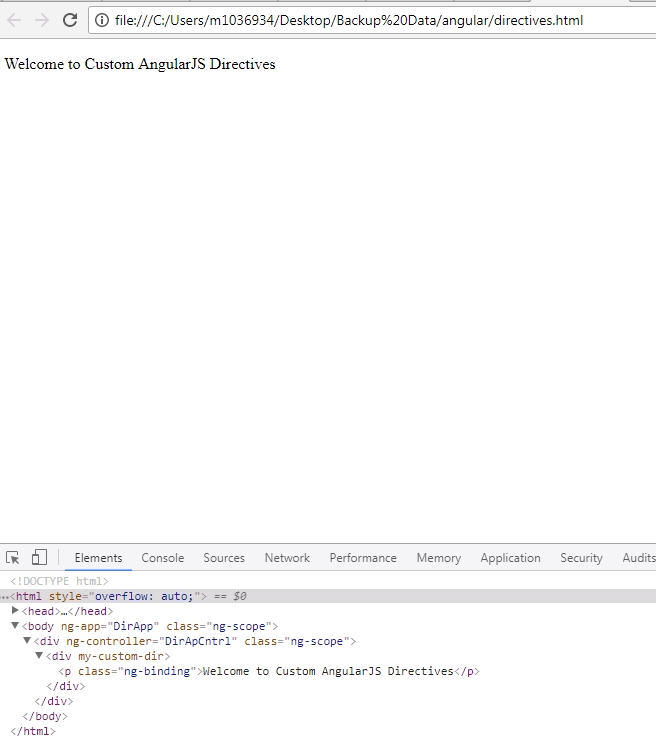
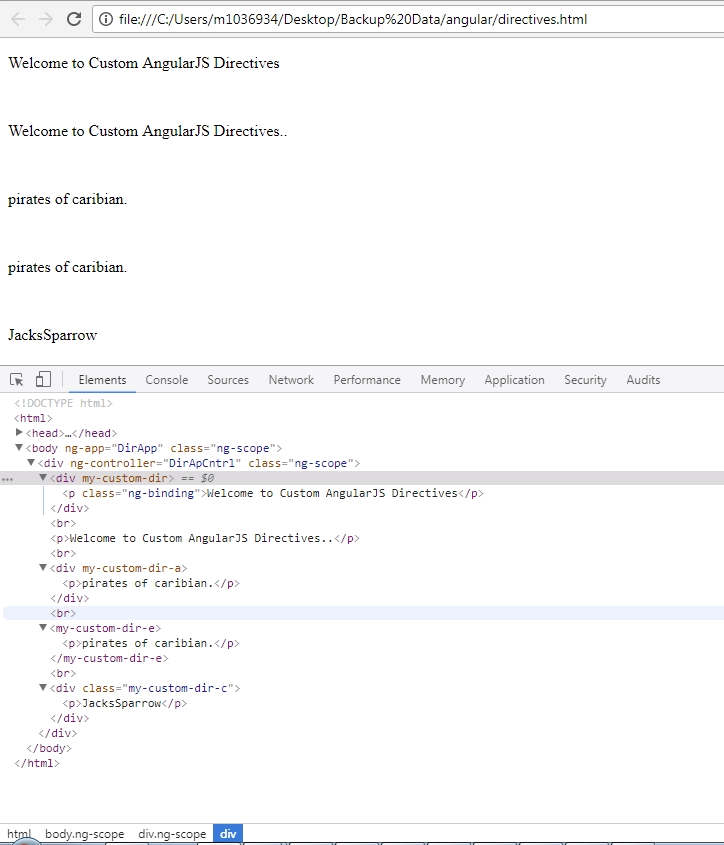
Just to make sure, how data is getting displayed I have used Firebug to show detailed HTML structure to you. By using Firebug, you can find that your data is being printed inside your custom Directive.
Welcome to Custom AngularJS Directives
Directive.js
By now you must have a pretty good idea about creating an Angular module for your application. You also have enough knowledge on Angular controller, how to create them and use across the application.
Creating a custom directive uses similar fashion like factory service creation. In case of factory service, we use the similar structure as above & service returns an object. Similarly, in custom Directive creation, we use the same formula.
The above code should return template having
{{result}}
. Here the result (above source code) is controller object. And having a static value "Welcome to Custom AngularJS Directives".
It’s okay to write small HTML tags inside an AngularJS application for custom Directive templates. However, we shouldn’t follow the same if we have large HTML codebase to be pushed to the Directives. Here we need to differentiate between HTML and JS in an Angular application. Note that it’s not a recommended guideline. How can we achieve the same, I will guide you in next example.
To achieve the above scenario and avoid writing nasty and huge HTML tags inside custom template under Directives, we can use ng-template. This built-in core directive is used to load the content of script into $templateCache.
Follow the below guide to make AngularJS work:
1. In ng-template,
Custom Directive uses template URL instead of template to fetch the data.
Here "my-custom-dir.htm" is the specific ID name. The same name has been taken in directives.html.
return {
      templateUrl: "my-custom-dir.htm"
    }
Output:

Still not sure how to make these template more modular and increase the usability for other AngularJS application.
Check out how to do that.
1. Create separate file.
2. Move your HTML code to the new file and save that file with the name "my-custom-dir.htm" as we did earlier.
My-custom-dir.htm
{{result}}
Directive.js
Directives.html
In the above source code, we have removed