Flutter is an open-source application SDK that allows you to build cross-platform (iOS and Android) apps with one programming language and codebase. Since flutter is an SDK it provides tools to compile your code to native machine code.
It is a Framework/Widget Library that gives Re-usable UI building blocks(widgets), utility functions and packages.
It uses Dart programming language (Developed by Google), focused on front-end user interface development. Dart is an object-oriented and strongly typed programming language and syntax of the dart is a mixture of Java, Javascript, swift and c/c++/c#.
Why do we need flutter?
You only have to learn or work with one programming language that is Dart, therefore, you will have a single codebase for both iOS and Android application. Since you don't have to build the same interface for iOS and android application, it saves you time.
- Flutter gives you an experience of native look and feel of mobile applications.
- It also allows you to develop games and add animations and 2D effects.
- And the app development will be fast as it allows hot reloading.
Development Platforms:
To develop a flutter application you will require Flutter SDK just like you need Android SDK to develop android application.
The IDEs you will need to develop flutter application are:
Android Studio: It is needed to run the emulator and Android SDK.
VS Code: VS code is the editor that you can use to write Dart code. (This is not required when we can write dart code in android studio or Xcode).
Xcode: Xcode is needed to run the iOS emulator.
Steps to install flutter in Linux:
Install Flutter(Linux)
To install flutter in the system follow the official doc.
Now here are some steps to install and running your first hello world android app with flutter:
After you are done with flutter installation from official docs, just open your Terminal and write
flutter doctor
you must see something like this:

Now to create flutter application write below command in you preferred directory(please use Latin letters, digits and underscores in the name of the app otherwise you may face some errors)
flutter create hello_world_app
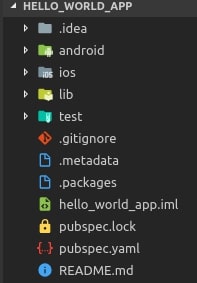
Now you should see the folder structure of the app like this:

Your application will be in hello_world_app/lib/main.dart
Point to be noted you will write most or maybe all of your code in the lib directory
Now you can replace main.dart file’s code with the code given below.
import 'package:flutter/material.dart';

void main() =>
    runApp(MyApp()); // main function is the entry point of the application

class MyApp extends StatelessWidget {
  // This widget is the root of your application.
  @override
  Widget build(BuildContext context) {
    return MaterialApp(
      home: Scaffold(
        appBar: AppBar(
          title: Text('HELLO WORLD'),
        ),
        body: Material(
          child: Center(
            child: Text('HELLO WORLD!'),
          ),
        ),
      ),
    );
  }
}
In flutter almost everything is a widget, flutter is full of widgets, it provides a widget for everything like Buttons, input fields, tables, dialogues tab bars and card views and list goes on.
Here in the first line, we have material.dart library imported, it is a rich set of material widgets that are implemented by material design
void main() => runApp(MyApp());
The main function is the very entry point of the application which call the runApp function and that takes MyApp widget and parameter
class MyApp extends StatelessWidget {
  @override
  Widget build(BuildContext context) {...}
}
This is a widget that you will use to build your app, it can either be stateful or stateless.
Stateful widget means which has mutable state and this kind of widget must have the createState() method.
Stateless widget means which does not have an internal state, like some image or some text field, it must have the build() method
Our app does not have a stateful widget as we don't have to change any state of the app
So the internal part is like this
MaterialApp() ⇒ a material design widgets wrapper,
Material() ⇒ Creates a piece of material
Scaffold() ⇒ Creates a visual scaffold for material design widgets.
AppBar() ⇒ is to create a material design app bar for the app
Center() ⇒ creates a widget to center its child widget
Text() ⇒ is a Text widget
To run this flutter application:
You will need android or iOS emulator or physical devices connected to run this app
You can you below given commands to run the app
flutter run ==> it will run the app on the connected device or emulator
flutter run -d DEVICE-ID ==> will run on a specific device or emulator
flutter run -d all ==> will run on all connected devices
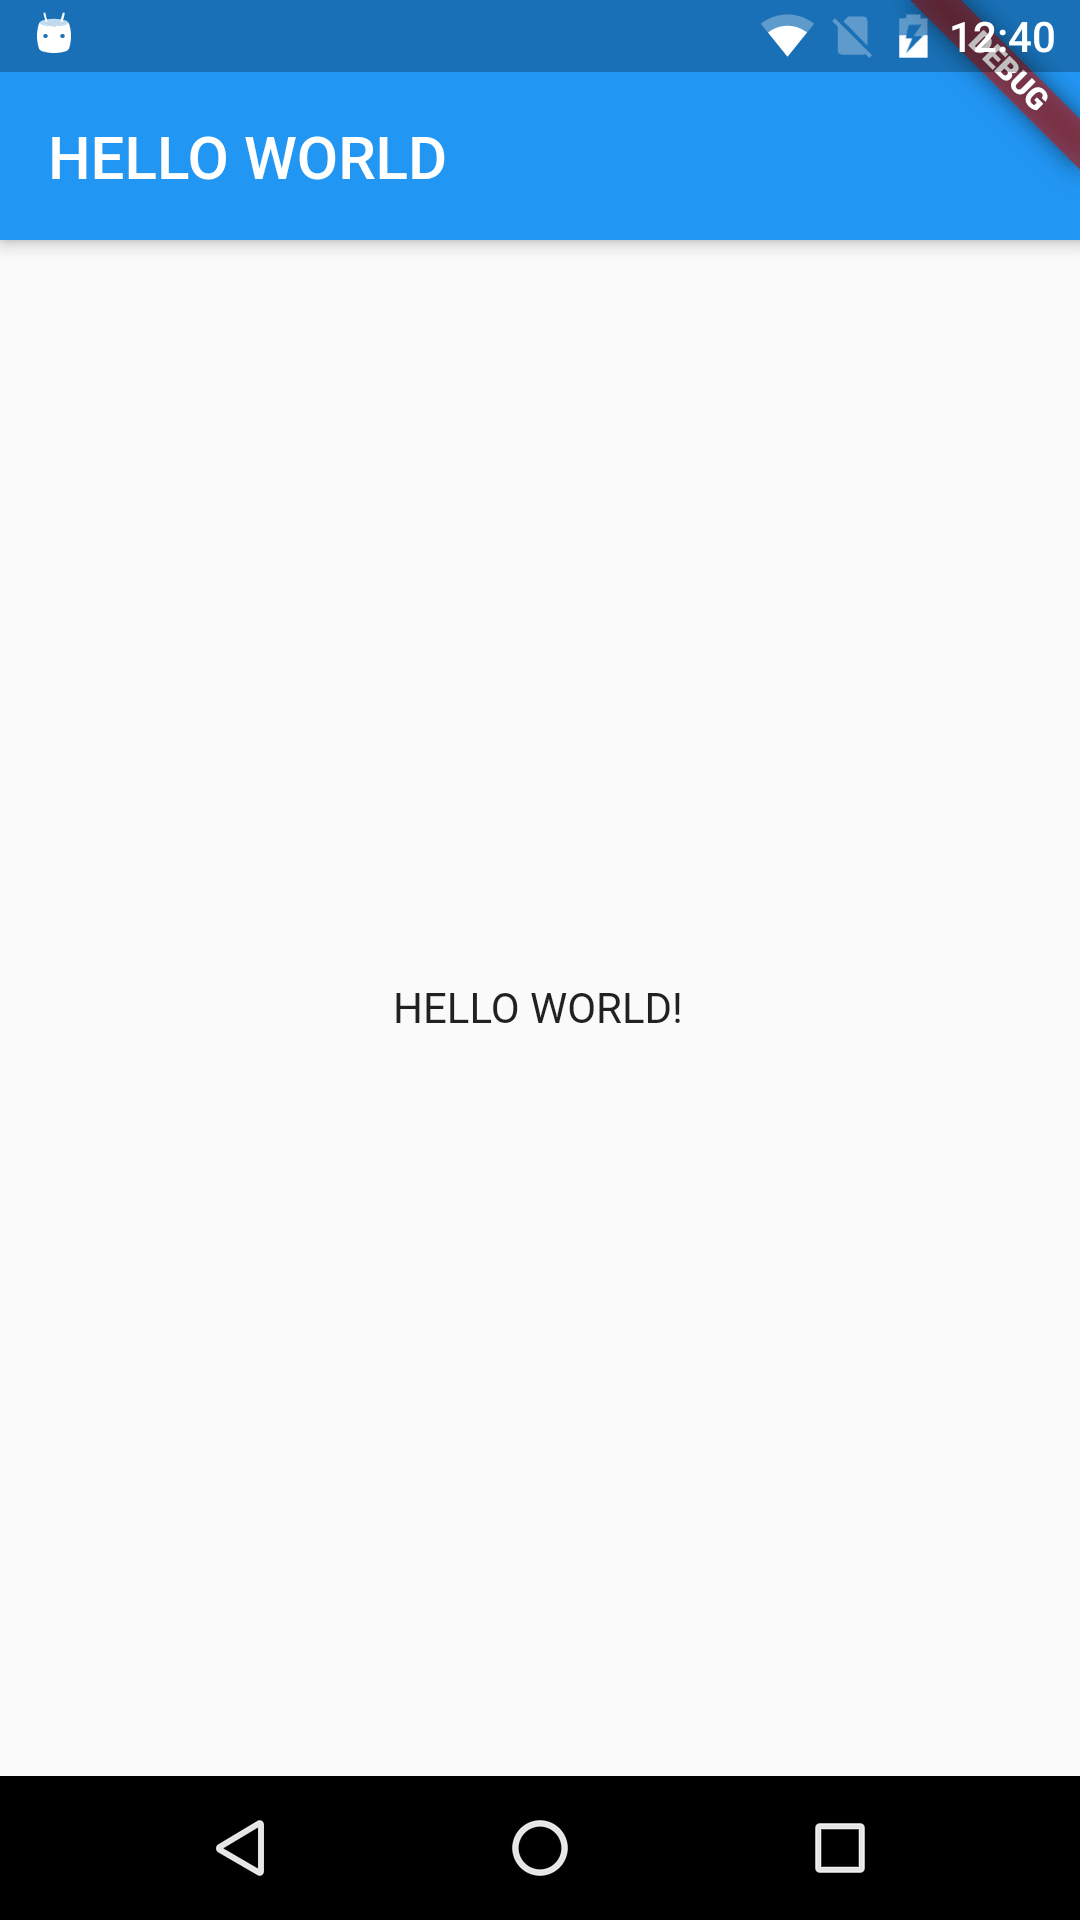
after this, you will see a screen something like this

Voila, just now we have build our first application using Flutter. This should be good starting point to develop database driven applications. I have built new application, treLo - road side assistance platform, using Flutter. We released this within one week of time. Would love to hear your feedback and kind of ideas you are working on using Flutter.


